Thursday, June 13, 2013

Bias

Some things are not worth waiting for. Particularly if you need to wait a really, really long time. So in the spirit of being practical I've added two careful (and optional) cheats into Aurora to make the kitchen scene perform better. The first one is a "caustic blur", essentially taking all C-[...]-D-S-[...]-L and similarly C-[...]-D-T-[...]-L paths and increasing the roughness at the specular vertices after a diffuse. The second one is a "firefly killer" to catch those few absurdly bright paths that pop up every once in a while. At the moment it's very naive in that it's looking at absolute brightness, but the plan is to update it to look for values N standard deviations outside of the mean pixel value at some point. This takes some more fiddling/trial and error though, so I'll stick with the simple version for now.

Here's what the caustic blur looks like for a mirror-like Cook/Torrance specular next to a diffuse plane, after 1 minute of rendering:
Blur 0 (no cheating):

Blur 0.1:

Blur 0.2:


While doing some more lighting work to the kitchen scene I noticed the performance goes down very fast as I add more light sources, so I improved the logic for picking which light to sample at each path vertex from being random to only considering lights within the domain of the bxdf for the given point and normal. I'm sure there are way better metrics out there but for now it improves the variance a lot, giving me slightly slower render times per progression but a lot less noise per progression with fewer paths wasted.

Here's the kitchen scene before/after the caustic, firefly and light sampling updates:
Rendered at 1920x800.
This one was stopped after 8+ hours with somewhere between 10k and 12k samples per pixel:

While this took 3h21min at 4k samples per pixel:

And here's what it looks like after the first 16 samples, at 51 seconds:

-Espen

Saturday, June 8, 2013

Brainmelt

I managed to sort out properly interpolated prim vars for Loop subdivison surfaces. My brain hurts now.


Edit: Added the metal material to the python layer so I can hook up textures etc in Maya. Not my finest piece of lookdev ever but I had a lot of fun, with the speed of interactive renders being pretty decent now.


-Espen

Shiny things 2

A few updates on the shading side this week. I've re implemented the Kelemen material (fixing a couple of embarrassing bugs along the way), and also added a basic metal material. It's using an old trick of doing per-rgb-component fresnel as a cheap approximation of a wavelength varying specular response for now. I'll go back in there and update to a better implementation later, but right now I want to move forward so I can get cracking on doing some texture work on this kitchen scene.

I still need to get UVs sorted for sub-d surfaces, and then look at using OpenImageIO for texture caching, as I'll be likely to run out of memory if I use my current naive way of keeping everything in memory.

Here are renders with a matte, kelemen and metal material, using the new sub-d code:


-Espen

Monday, June 3, 2013

Smoother rendering

I did a first pass at implementing sub division surfaces. At the moment it's pretty much a straight implementation of the Loop subdivision surface algorithm described in pbrt. It iteratively subdivides a triangle mesh a user defined number of times to estimate the limit surface of the original base mesh. Conceptually it's rather straight forward: Each triangle becomes 4 new ones with vertices at the midpoint of each edge, but the implementation turned out to be more hairy than I had assumed, with edge cases for boundary edges and assumptions about the vertex order in the base mesh.

I still have some work left before moving on, as right now all I do is sub divide the vertices and assign them the limit surface normal. I need to also interpolate prim vars (UVs, etc), and I want to look into camera space driven subdivision level akin to the Shading Rate in prman, although that rabbit hole might go deeper than the benefits of a global dicing knob justifies.

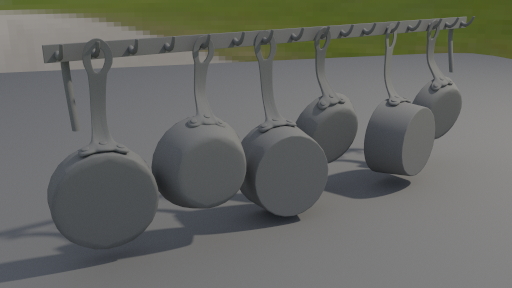
Here's a quick test of sub dividing some pots and pans from the kitchen scene in the last post:


Level 0 - 7 968 triangles

Level 1 - 31 866 triangles
Level 2 - 127 458 triangles
Level 3 - 509 826 triangles
 
-Espen

Saturday, June 1, 2013

... again!

Apparently announcing my return to the world of blogging is bad karma, so this time I'll tone it back to being cautiously optimistic. Instead, let me announce that I'm now a proud member of the Peregrine Labs rnd team. After years of doing hands on vfx it's a lot of fun bringing that experience to the software development side of the camp. It also means the re discovery of weekends, and some fresh motivation for tinkering with my own projects on the side.

While dusting off the Aurora code base, I've removed hundreds of lines of code while questioning the sanity of who ever wrote it. A couple of days later the engine now runs more than 3x faster, and I'm still ripping pieces out and replacing them with shinier ones, like this halton sequence implementation by Leonhard Grunchloss. I'm not sure exactly how much time I'll have for Aurora going forward, but I'll be sporadically updating whenever there are new things to show.

Here's a fun scene I found from an old CGTalk Lighting Challenge, modeled by Sapna Mondol:


It's a reasonably light weight and well organized scene with some good challenges, so I figured I'd try and use it as a base for further development.

Towards the top of the list are things like:
- Sub-division surfaces
- Displacement
- A brdf for metals
- And a good portion cleanup of the pre light transport pipeline.

-Espen

Saturday, November 24, 2012

I'm back!

It's been very busy at work, but I'm finally getting some time to sit down and work on Aurora again. I wrapped up my second pass at a shading engine, and as anyone coming back to a personal project after a few weeks off I'm realizing I need to spend some time on code cleanup before moving back onto more features.

The new engine now supports an arbitrary graph of shaders, which MtoAur currently parses from Maya's Hypershade and dumps into the scene description. I don't support that many nodes yet, but now that I have the framework in place that should be the easy part.

In an attempt to break the record in ray tracer cliches here's the Stanford bunny and -dragon in the Sponza model (by Marko Dabrovic):


-Espen

Saturday, October 13, 2012

Lights

Things are super busy, so I haven't had much time for Aurora updates the last couple of weeks, but I spent a morning playing around with re lighting the museum scene.

At more than 20 light sources  it's taking 16k samples per pixel to get even close to a clean result while I needed no more than 4k when it was just a couple of lights and much softer lighting, so I need to work on the light sampling logic at some point. From an interactivity point of view it's taking only about a minute to get a reasonable looking preview, though, so it's not all bad. Actually, the slowest part was exporting all the geo from Maya on every update, so I added a "lazy geo" option to the render globals in the Maya translator.

2k film res, 16 bounces and 1.5 mill polys:


-Espen