After coming back from another Siggraph I have realized that I've missed updating this blog. I haven't touched Aurora much the least year, so it didn't occur to me to post anything, but I've been tinkering with other cool stuff in the meantime, so watch this space for non-Aurora updates in the near future.
In an effort to make Aurora more interesting than just adding features to the existing engine I've decided to move it in a slightly different direction - to iOS. There are a million different path tracers out there and they're pretty much all doing a better job than Aurora anyway, but I haven't seen a decent lighting/material editing sandbox on the ipad yet. There are a couple of fractal renderers but I'd love to see one where you can bring in object files from apps like treesketch, one of the scuplting apps or simply a desktop modeler, and tweak materials, add textures and make it look nice.
Anyway, for now it's just an experiment for me to tinker with and see if I can make something like that happen, and it remains to be seen whether I can cook up something useful before getting bored and moving on to other things again.
After a couple of nights of coding, here's a bare bones version running on an early generation iPad:
The entire engine is still c++, with objective c being used only for the UI (which right now is as simple as it can possibly be). I've stripped out the tbb threading and embree bvh, so it's increadibly, unbelievably and unbearably slow.
-Espen
Monday, August 25, 2014
Saturday, July 27, 2013
Normal maps
I'm still on the road, but had some time to tinker with Aurora while traveling to and from Siggraph. I've added some more stats tracking to the back end, and implemented normal mapping as the final feature needed to wrap up the kitchen scene.
Here's a quick test. For normal map extraction I used CrazyBump.
-Espen
Here's a quick test. For normal map extraction I used CrazyBump.
-Espen
Tuesday, July 2, 2013
Kitchen scene update
I'll be traveling for the next month or two, so since there will probably be a lack of updates for a while I figured I'd share my progress on the kitchen scene. There's a little bit of comp work on this one - mostly just some lense glow and a simple film-esque LUT. The texturing is all bombing for now, and only the metals have any meaningful lookdev. Left to do is getting textures on the remaining materials and then a round of refinement as it's a bit all over the place right now.
-Espen
-Espen
Monday, June 17, 2013
Triplanar Texturing
I love texture bombing. Anything that lets me blast a decent manifold onto a huge set of geometry usually means saving hours of painful unwrapping and days of painting on geometry. We used this stuff all the time at Weta, and it always amazed me what you can get away with. Combine it with a shader graph of some carefully painted details where they're important, and you got yourself a decent environment lookdev pipeline.
Starting off with an easy one I added a Triplanar shader to Aurora. It's the most naive way of bombing a manifold onto arbitrary geometry: All it does is put a mix of three perpendicular ortographic projections based on the surface normal and some parameter that describes how soft/hard you want the transition to be.
Thursday, June 13, 2013
Bias
Some things are not worth waiting for. Particularly if you need to wait a really, really long time. So in the spirit of being practical I've added two careful (and optional) cheats into Aurora to make the kitchen scene perform better. The first one is a "caustic blur", essentially taking all C-[...]-D-S-[...]-L and similarly C-[...]-D-T-[...]-L paths and increasing the roughness at the specular vertices after a diffuse. The second one is a "firefly killer" to catch those few absurdly bright paths that pop up every once in a while. At the moment it's very naive in that it's looking at absolute brightness, but the plan is to update it to look for values N standard deviations outside of the mean pixel value at some point. This takes some more fiddling/trial and error though, so I'll stick with the simple version for now.
Here's what the caustic blur looks like for a mirror-like Cook/Torrance specular next to a diffuse plane, after 1 minute of rendering:
Blur 0 (no cheating):
Blur 0.1:
Blur 0.2:
While doing some more lighting work to the kitchen scene I noticed the performance goes down very fast as I add more light sources, so I improved the logic for picking which light to sample at each path vertex from being random to only considering lights within the domain of the bxdf for the given point and normal. I'm sure there are way better metrics out there but for now it improves the variance a lot, giving me slightly slower render times per progression but a lot less noise per progression with fewer paths wasted.
Here's the kitchen scene before/after the caustic, firefly and light sampling updates:
Rendered at 1920x800.
This one was stopped after 8+ hours with somewhere between 10k and 12k samples per pixel:
While this took 3h21min at 4k samples per pixel:
And here's what it looks like after the first 16 samples, at 51 seconds:
Here's what the caustic blur looks like for a mirror-like Cook/Torrance specular next to a diffuse plane, after 1 minute of rendering:
Blur 0 (no cheating):
Blur 0.1:
Blur 0.2:
While doing some more lighting work to the kitchen scene I noticed the performance goes down very fast as I add more light sources, so I improved the logic for picking which light to sample at each path vertex from being random to only considering lights within the domain of the bxdf for the given point and normal. I'm sure there are way better metrics out there but for now it improves the variance a lot, giving me slightly slower render times per progression but a lot less noise per progression with fewer paths wasted.
Here's the kitchen scene before/after the caustic, firefly and light sampling updates:
Rendered at 1920x800.
This one was stopped after 8+ hours with somewhere between 10k and 12k samples per pixel:
While this took 3h21min at 4k samples per pixel:
And here's what it looks like after the first 16 samples, at 51 seconds:
-Espen
Saturday, June 8, 2013
Brainmelt
I managed to sort out properly interpolated prim vars for Loop subdivison surfaces. My brain hurts now.
Edit: Added the metal material to the python layer so I can hook up textures etc in Maya. Not my finest piece of lookdev ever but I had a lot of fun, with the speed of interactive renders being pretty decent now.
-Espen
Edit: Added the metal material to the python layer so I can hook up textures etc in Maya. Not my finest piece of lookdev ever but I had a lot of fun, with the speed of interactive renders being pretty decent now.
-Espen
Shiny things 2
A few updates on the shading side this week. I've re implemented the Kelemen material (fixing a couple of embarrassing bugs along the way), and also added a basic metal material. It's using an old trick of doing per-rgb-component fresnel as a cheap approximation of a wavelength varying specular response for now. I'll go back in there and update to a better implementation later, but right now I want to move forward so I can get cracking on doing some texture work on this kitchen scene.
I still need to get UVs sorted for sub-d surfaces, and then look at using OpenImageIO for texture caching, as I'll be likely to run out of memory if I use my current naive way of keeping everything in memory.
Here are renders with a matte, kelemen and metal material, using the new sub-d code:
-Espen
I still need to get UVs sorted for sub-d surfaces, and then look at using OpenImageIO for texture caching, as I'll be likely to run out of memory if I use my current naive way of keeping everything in memory.
Here are renders with a matte, kelemen and metal material, using the new sub-d code:
-Espen
Monday, June 3, 2013
Smoother rendering
I did a first pass at implementing sub division surfaces. At the moment it's pretty much a straight implementation of the Loop subdivision surface algorithm described in pbrt. It iteratively subdivides a triangle mesh a user defined number of times to estimate the limit surface of the original base mesh. Conceptually it's rather straight forward: Each triangle becomes 4 new ones with vertices at the midpoint of each edge, but the implementation turned out to be more hairy than I had assumed, with edge cases for boundary edges and assumptions about the vertex order in the base mesh.
I still have some work left before moving on, as right now all I do is sub divide the vertices and assign them the limit surface normal. I need to also interpolate prim vars (UVs, etc), and I want to look into camera space driven subdivision level akin to the Shading Rate in prman, although that rabbit hole might go deeper than the benefits of a global dicing knob justifies.
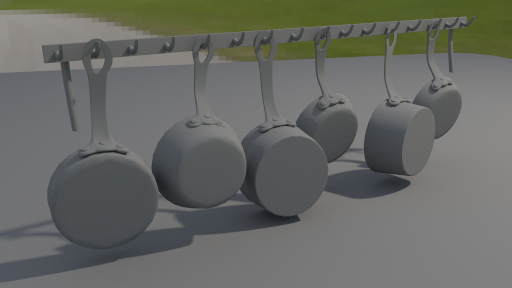
Here's a quick test of sub dividing some pots and pans from the kitchen scene in the last post:
Level 0 - 7 968 triangles
Level 1 - 31 866 triangles
Level 2 - 127 458 triangles
Level 3 - 509 826 triangles
I still have some work left before moving on, as right now all I do is sub divide the vertices and assign them the limit surface normal. I need to also interpolate prim vars (UVs, etc), and I want to look into camera space driven subdivision level akin to the Shading Rate in prman, although that rabbit hole might go deeper than the benefits of a global dicing knob justifies.
Here's a quick test of sub dividing some pots and pans from the kitchen scene in the last post:
Level 0 - 7 968 triangles
Level 1 - 31 866 triangles
Level 2 - 127 458 triangles
Level 3 - 509 826 triangles
-Espen
Saturday, June 1, 2013
... again!
Apparently announcing my return to the world of blogging is bad karma, so this time I'll tone it back to being cautiously optimistic. Instead, let me announce that I'm now a proud member of the Peregrine Labs rnd team. After years of doing hands on vfx it's a lot of fun bringing that experience to the software development side of the camp. It also means the re discovery of weekends, and some fresh motivation for tinkering with my own projects on the side.
While dusting off the Aurora code base, I've removed hundreds of lines of code while questioning the sanity of who ever wrote it. A couple of days later the engine now runs more than 3x faster, and I'm still ripping pieces out and replacing them with shinier ones, like this halton sequence implementation by Leonhard Grunchloss. I'm not sure exactly how much time I'll have for Aurora going forward, but I'll be sporadically updating whenever there are new things to show.
Here's a fun scene I found from an old CGTalk Lighting Challenge, modeled by Sapna Mondol:
It's a reasonably light weight and well organized scene with some good challenges, so I figured I'd try and use it as a base for further development.
Towards the top of the list are things like:
- Sub-division surfaces
- Displacement
- A brdf for metals
- And a good portion cleanup of the pre light transport pipeline.
-Espen
While dusting off the Aurora code base, I've removed hundreds of lines of code while questioning the sanity of who ever wrote it. A couple of days later the engine now runs more than 3x faster, and I'm still ripping pieces out and replacing them with shinier ones, like this halton sequence implementation by Leonhard Grunchloss. I'm not sure exactly how much time I'll have for Aurora going forward, but I'll be sporadically updating whenever there are new things to show.
Here's a fun scene I found from an old CGTalk Lighting Challenge, modeled by Sapna Mondol:
It's a reasonably light weight and well organized scene with some good challenges, so I figured I'd try and use it as a base for further development.
Towards the top of the list are things like:
- Sub-division surfaces
- Displacement
- A brdf for metals
- And a good portion cleanup of the pre light transport pipeline.
-Espen
Saturday, November 24, 2012
I'm back!
It's been very busy at work, but I'm finally getting some time to sit down and work on Aurora again. I wrapped up my second pass at a shading engine, and as anyone coming back to a personal project after a few weeks off I'm realizing I need to spend some time on code cleanup before moving back onto more features.
The new engine now supports an arbitrary graph of shaders, which MtoAur currently parses from Maya's Hypershade and dumps into the scene description. I don't support that many nodes yet, but now that I have the framework in place that should be the easy part.
In an attempt to break the record in ray tracer cliches here's the Stanford bunny and -dragon in the Sponza model (by Marko Dabrovic):
-Espen
The new engine now supports an arbitrary graph of shaders, which MtoAur currently parses from Maya's Hypershade and dumps into the scene description. I don't support that many nodes yet, but now that I have the framework in place that should be the easy part.
In an attempt to break the record in ray tracer cliches here's the Stanford bunny and -dragon in the Sponza model (by Marko Dabrovic):
-Espen
Saturday, October 13, 2012
Lights
Things are super busy, so I haven't had much time for Aurora updates the last couple of weeks, but I spent a morning playing around with re lighting the museum scene.
At more than 20 light sources it's taking 16k samples per pixel to get even close to a clean result while I needed no more than 4k when it was just a couple of lights and much softer lighting, so I need to work on the light sampling logic at some point. From an interactivity point of view it's taking only about a minute to get a reasonable looking preview, though, so it's not all bad. Actually, the slowest part was exporting all the geo from Maya on every update, so I added a "lazy geo" option to the render globals in the Maya translator.
2k film res, 16 bounces and 1.5 mill polys:
-Espen
At more than 20 light sources it's taking 16k samples per pixel to get even close to a clean result while I needed no more than 4k when it was just a couple of lights and much softer lighting, so I need to work on the light sampling logic at some point. From an interactivity point of view it's taking only about a minute to get a reasonable looking preview, though, so it's not all bad. Actually, the slowest part was exporting all the geo from Maya on every update, so I added a "lazy geo" option to the render globals in the Maya translator.
2k film res, 16 bounces and 1.5 mill polys:
-Espen
Saturday, September 29, 2012
Parsing shaders
I've done some more work on the Maya translator to support the new concept of shaders.
A "Shader" in Aurora is responsible for prelighting only. They're somewhat atomic pieces of logic that given shading geometry and some parameters produce either a color or float (for now. I'll introduce manifolds, prim vars and other fun concepts later) which forms a virtual node graph that eventually feeds into the material properties of the "Material". The material interfaces with the integrators, and is responsible for handing over a singe BxDF during light transport. So far I've only written a texture2d shader with exr support and a noise3d shader with support for various transforms and spaces, but now that I have a generalized framework for shading they're pretty straight forward/quick to write, so I'll add a bunch more as I get time.
The Python and Maya material interface is monolithic/ubershader-style for now - I just piggy back on the existing Maya material node, and throw a bunch of my own attributes on there and parse these during scene translation. Internally it's all very modular, but while I figure out how to best parse/manage that elegantly it'll do for now. I suspect I can leverage the Hypershade in Maya, but I'll need to flesh out how to best handle it while parsing and also how to write custom nodes in Maya. Testing it out on a bigger scene it's behaving fine, but it's a pretty big impact on render times. It's nice to be able to control things interactively in Maya, though (although I haven't implemented any IPR style rendering yet rendering with only a single bounce is pretty fast).
The framework puts a clean line between prelighting and lighting allowing me to adaptively cache the former and stay unbiased. There's no caching mechanism implemented yet, though, so shaders are being re executed upwards of thousands of times more than needed.
A quick test on a medium sized scene:
1.5 mill polys, 9 light sources, multiple different materials, some with a procedural noise shader. 2048x1024 res, 8k samples per pixel and 16 light bounces. Render time was around 12h on my laptop, but it should drop considerably once I'm done with the shader cache. The lighting and material settings are pretty arbitrary, but I'm thinking I'll try and use this scene as a testing ground for my engine going forward by polishing it up a bit with textures and some proper lookdev and lighting. (Although the thought of UV mapping this beast isn't exactly intriguing..)
-Espen
A "Shader" in Aurora is responsible for prelighting only. They're somewhat atomic pieces of logic that given shading geometry and some parameters produce either a color or float (for now. I'll introduce manifolds, prim vars and other fun concepts later) which forms a virtual node graph that eventually feeds into the material properties of the "Material". The material interfaces with the integrators, and is responsible for handing over a singe BxDF during light transport. So far I've only written a texture2d shader with exr support and a noise3d shader with support for various transforms and spaces, but now that I have a generalized framework for shading they're pretty straight forward/quick to write, so I'll add a bunch more as I get time.
The Python and Maya material interface is monolithic/ubershader-style for now - I just piggy back on the existing Maya material node, and throw a bunch of my own attributes on there and parse these during scene translation. Internally it's all very modular, but while I figure out how to best parse/manage that elegantly it'll do for now. I suspect I can leverage the Hypershade in Maya, but I'll need to flesh out how to best handle it while parsing and also how to write custom nodes in Maya. Testing it out on a bigger scene it's behaving fine, but it's a pretty big impact on render times. It's nice to be able to control things interactively in Maya, though (although I haven't implemented any IPR style rendering yet rendering with only a single bounce is pretty fast).
The framework puts a clean line between prelighting and lighting allowing me to adaptively cache the former and stay unbiased. There's no caching mechanism implemented yet, though, so shaders are being re executed upwards of thousands of times more than needed.
A quick test on a medium sized scene:
1.5 mill polys, 9 light sources, multiple different materials, some with a procedural noise shader. 2048x1024 res, 8k samples per pixel and 16 light bounces. Render time was around 12h on my laptop, but it should drop considerably once I'm done with the shader cache. The lighting and material settings are pretty arbitrary, but I'm thinking I'll try and use this scene as a testing ground for my engine going forward by polishing it up a bit with textures and some proper lookdev and lighting. (Although the thought of UV mapping this beast isn't exactly intriguing..)
-Espen
Tuesday, September 25, 2012
Bring the noise
Turbulence style world space Perlin noise implementation. I still need to add the interface to this in the python API and Maya, but for now I'm having too much fun with this shading stuff to worry about pesky details like UI control.
-Espen
Monday, September 24, 2012
squares
That's right. Gone are the days of constant colored Stanford models. Textures are the new black, green, pink and orange.
I added a shading engine responsible for feeding bxdfs their coefficients, so I finally have an appropriate environment for things like texture mapping. There are a lot of features to be written, but the framework is there now so this is where the fun begins. I kinda broke my obj parser in the process of adding prim var support, so normals are back to faceted but that's all temporary. Be prepared for a bunch of updates on the shading side.
-Espen
Thursday, September 20, 2012
No news is no news
No shiny new features this week, as I'm still fumbling around underneath the hood. Exciting times are close, though.
Here are some renders I ran as a sanity check for my kelemen material and infinite area light. 1024 by 1024, single environment light source, 8 light bounces, 1m polys, forgot to check the pixel samples. Render times were 15-20 min.
-Espen
Here are some renders I ran as a sanity check for my kelemen material and infinite area light. 1024 by 1024, single environment light source, 8 light bounces, 1m polys, forgot to check the pixel samples. Render times were 15-20 min.
-Espen
Monday, September 17, 2012
Micro facets
In this weeks episode I've been cleaning up my material code. I've changed the microfacet distribution of my specular model to the modified Beckmann distribution suggested by Kelemen et al, and made the interface a bit more generic than before, so I can extend it to a bsdf next when I add subsurface scattering - and later plug in a shading engine to support varying parameters through texturing, procedural patterns etc.
For now, here's a pink buddah. 2048x2048, 4k samples per pixel, 10 light bounces.
-Espen
For now, here's a pink buddah. 2048x2048, 4k samples per pixel, 10 light bounces.
-Espen
Monday, September 10, 2012
Embree
I'm doing some work on the back end of Aurora to make things go faster. Being that so many parts of the engine is a first pass, there's a ton of room for improvement. First up was comparing my core to that of a tested production engine. Now, it's hard - of not impossible - to get a good one-to-one comparison with any complete engine, and a lot of open source material out there is more geared towards research than production, but there are a few packages out there that has what I'm after - in particular Embree seems to be a good one.
"Embree is a collection of high-performance ray tracing kernels, developed at Intel Labs. The kernels are optimized for photo-realistic rendering on the latest Intel® processors with support for the SSE and AVX instruction sets. In addition to the ray tracing kernels, Embree provides an example photo-realistic rendering engine. Embree is designed for Monte Carlo ray tracing algorithms, where the vast majority of rays are incoherent. The specific single-ray traversal kernels in Embree provide the best performance in this scenario and they are very easy to integrate into existing applications."
And they weren't joking about the last part. With no external dependencies and a straight forward interface it only took about a morning to replace my kd tree and triangle intersection code with the BVH and intersection kernels in Embree and compare some render times. Fearing the worst, it wasn't all bad news.
The acceleration structure build times went from a few seconds for medium sized scenes (few hundred thousand polys) and a minute+ for huge ones (several mill) to less than a second for all cases I could throw at it, which I believe is mostly down to the fact that mine isn't multi threaded and has a pretty steep algorithmic complexity that doesn't do well with high tree depths. I have a couple of papers on faster KDtree build algorithms that I'm keen on trying out.
Overall render speed improved by about 2-3x for smaller scenes up to 4-5 times for bigger ones. While a lot of that comes from the lack of SSE in my own code it also speaks of either bad memory layout or room for improvement on the tree traversal side of things. While the plan is to get my own code up to speed with the SSE and compiler trickery going on in Embree, I'm more keen on getting on with other features at the moment, so I'm leaving the embree kernels in there and will come back to this later.
For now, here are some renders I ran to see what I'm looking at in terms of render times and convergence points for medium sized scenes with different material types.
1024x1024 pixels, 250k polys, 3 area light sources, 10 light bounces, 8k samples per pixel and Stanford Lucy with a lambert, a glossy Kelemen material and the new and improved Glass material for speed comparison. The lambert material is converging at pretty reasonable rate, but the caustics from glossy/mirror lobes needs a lot more samples so I definitely need some smarter algorithm for path sampling/integration.
Before heading down that path, though, I'm seeing some valleys in the CPU load that seems to correlate with my display driver blocking the main thread and making everyone wait, so I'll make sure it plays nice with others and works in parallel like everything else for what hopefully will be some more speed improvements.
-Espen
"Embree is a collection of high-performance ray tracing kernels, developed at Intel Labs. The kernels are optimized for photo-realistic rendering on the latest Intel® processors with support for the SSE and AVX instruction sets. In addition to the ray tracing kernels, Embree provides an example photo-realistic rendering engine. Embree is designed for Monte Carlo ray tracing algorithms, where the vast majority of rays are incoherent. The specific single-ray traversal kernels in Embree provide the best performance in this scenario and they are very easy to integrate into existing applications."
And they weren't joking about the last part. With no external dependencies and a straight forward interface it only took about a morning to replace my kd tree and triangle intersection code with the BVH and intersection kernels in Embree and compare some render times. Fearing the worst, it wasn't all bad news.
The acceleration structure build times went from a few seconds for medium sized scenes (few hundred thousand polys) and a minute+ for huge ones (several mill) to less than a second for all cases I could throw at it, which I believe is mostly down to the fact that mine isn't multi threaded and has a pretty steep algorithmic complexity that doesn't do well with high tree depths. I have a couple of papers on faster KDtree build algorithms that I'm keen on trying out.
Overall render speed improved by about 2-3x for smaller scenes up to 4-5 times for bigger ones. While a lot of that comes from the lack of SSE in my own code it also speaks of either bad memory layout or room for improvement on the tree traversal side of things. While the plan is to get my own code up to speed with the SSE and compiler trickery going on in Embree, I'm more keen on getting on with other features at the moment, so I'm leaving the embree kernels in there and will come back to this later.
For now, here are some renders I ran to see what I'm looking at in terms of render times and convergence points for medium sized scenes with different material types.
1024x1024 pixels, 250k polys, 3 area light sources, 10 light bounces, 8k samples per pixel and Stanford Lucy with a lambert, a glossy Kelemen material and the new and improved Glass material for speed comparison. The lambert material is converging at pretty reasonable rate, but the caustics from glossy/mirror lobes needs a lot more samples so I definitely need some smarter algorithm for path sampling/integration.
Before heading down that path, though, I'm seeing some valleys in the CPU load that seems to correlate with my display driver blocking the main thread and making everyone wait, so I'll make sure it plays nice with others and works in parallel like everything else for what hopefully will be some more speed improvements.
-Espen
Thursday, September 6, 2012
Refracting bunny
Hopefully bug free this time. I fixed the error where paths including a diffuse or glossy material and ending with Transmit->Light (or "direct caustics" I guess) where not contributing energy, and things are looking a lot better.
Next up is performance improvements, and running some contrived tests to ensure things are still unbiased and otherwise visually behaving like expected.
1024x1024, two area lights, glass material with an ior of 1.55, a whole lot of pixel samples.
Next up is performance improvements, and running some contrived tests to ensure things are still unbiased and otherwise visually behaving like expected.
1024x1024, two area lights, glass material with an ior of 1.55, a whole lot of pixel samples.
-Espen
Monday, September 3, 2012
Bending rays
What's a ray tracer without some good old caustics? With smooth shading normals in place the next logical step was to get specular transmission in there and refract some rays. Compared to the microfacet stuff I've been digging into for specular models implementing a perfect mirror model was reassuringly straight forward. I added a reflective mirror brdf for good measure and wrapped it all into a glass material. Tinting is currently done at the interface only - so no fancy volumetric absorption along the ray until I have a proper volume pipeline, but it does the trick for now.
EDIT2: I was using this scene as a performance test, but figured I could throw a sphere in there to show off the caustics as my other render was broken.
2048x2048, 16 bounces, 1 mill polys, 15k samples per pixel (naive forward path tracing does not converge caustics particularly fast..):
Here's our hero with an index of refraction of 1.5:
EDIT: This one actually has a pretty hilarious - and rather obvious now that I've found it - bug. There are no caustics from direct light sources here (ie, Eye -> Diffuse -> Transmit -> Transmit -> Light paths), only from indirect lighting (Eye -> Diffuse -> Transmit -> Transmit -> Diffuse/Glossy -> Light), so only bounce from the floor is contributing to the caustics, not the light source itself. I'll leave the render up regardless, and post a correct one once I've wrapped up what I'm currently working on.
-Espen
EDIT2: I was using this scene as a performance test, but figured I could throw a sphere in there to show off the caustics as my other render was broken.
2048x2048, 16 bounces, 1 mill polys, 15k samples per pixel (naive forward path tracing does not converge caustics particularly fast..):
Here's our hero with an index of refraction of 1.5:
EDIT: This one actually has a pretty hilarious - and rather obvious now that I've found it - bug. There are no caustics from direct light sources here (ie, Eye -> Diffuse -> Transmit -> Transmit -> Light paths), only from indirect lighting (Eye -> Diffuse -> Transmit -> Transmit -> Diffuse/Glossy -> Light), so only bounce from the floor is contributing to the caustics, not the light source itself. I'll leave the render up regardless, and post a correct one once I've wrapped up what I'm currently working on.
-Espen
Thursday, August 30, 2012
Reel Update
I haven't done one of these in a while, so here goes: A selection of work form the last couple of years. John Carter, Wrath of the Titans and Pirates of the Caribbean were done at Moving Picture Company in London, while Trollhunter, Max Manus and various commercials were done at Storm Studios in Oslo.
Espen Nordahl vfx reel 2012 from Espen Nordahl on Vimeo.
-Espen
Espen Nordahl vfx reel 2012 from Espen Nordahl on Vimeo.
-Espen
Subscribe to:
Posts (Atom)